Basics - Window Coordinates
Tutorial Info
- Author: mitchmindtree
- Required Knowledge:
- Reading Time: 15 minutes
Coordinates can be used to describe a position in space. Before we start drawing things in certain locations within our window, or animating them to move in certain directions, it can be very useful to understand the coordinate system that we are working with.
Different kinds of coordinate systems are useful for different purposes. Let’s take a look at nannou’s window coordinates.
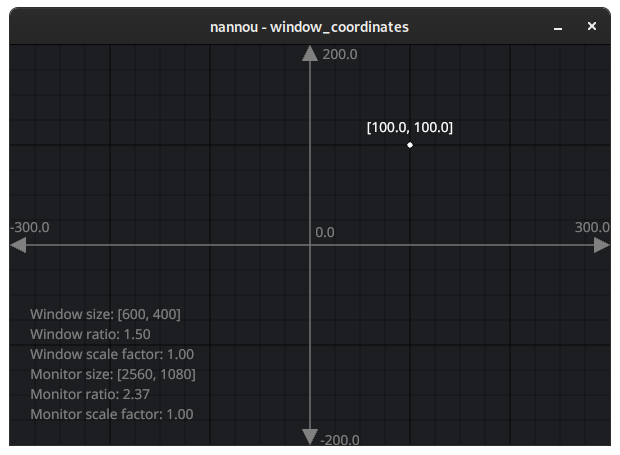
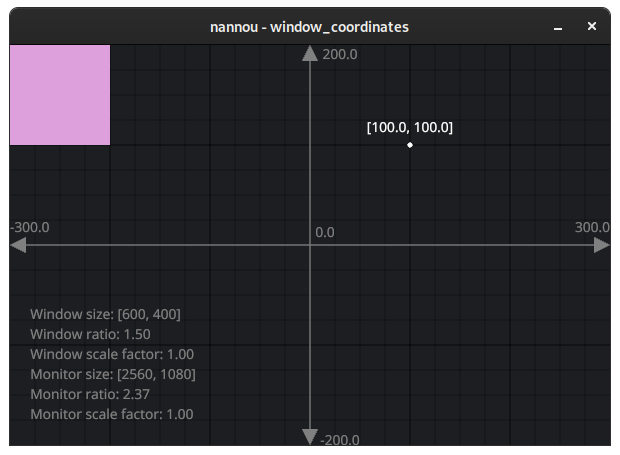
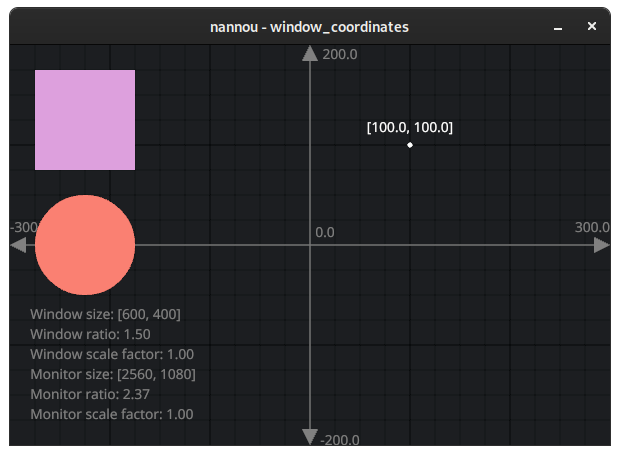
This is a screenshot of the window_coordinates.rs example. The example
aims to help develop an intuition for how nannou’s window coordinates work. In
this case, we are presented with a window whose size is 600x400. We can see
that:
- The x and y values are
[0.0, 0.0]in the centre of the window. This is called the origin. - The x value increases towards the right and decreases towards the left.
- The y value increases upwards and decreases downwards.
- The distance from the left edge to the right edge is 600, equal to the window width.
- The distance from the bottom edge to the top edge is 400, equal to the window height.
- The distance from the centre to the left or right edge is 300, or half the window width.
- The distance from the centre to the top or bottom edge is 200, or half the window height.
In other words, nannou uses a Cartesian coordinate system to describe window space, where the origin is in the centre, y increases upwards and the distance between the edges of the window are equal to the size of the window.
Drawing in Window Coordinates
Having the origin in the centre is a theme that carries through to the way that
we draw shapes with nannou’s draw API. Let’s see what happens if we
change the example to draw a plum colored square at [0.0, 0.0] and with a size
of 100.0.
#![allow(unreachable_code, unused_variables)]
use nannou::prelude::*;
fn main() {
    let draw: Draw = unimplemented!();
draw.rect()
    .x_y(0.0, 0.0)
    .w_h(100.0, 100.0)
    .color(PLUM);
}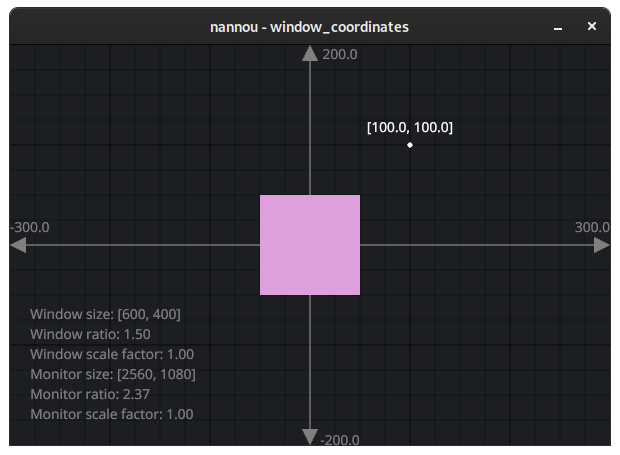
Notice that when we say .x_y(0.0, 0.0), this refers to where the centre of
the square will be placed. You might notice the same applies to other drawing
primitives like ellipse and text.
Rotating the square
This property of describing positions via the centre allows for performing all kinds of symmetrical operations with ease. Rotations are a nice example of this. Let’s try rotating our plum square by 45 degrees.
#![allow(unreachable_code, unused_variables)]
use nannou::prelude::*;
fn main() {
    let draw: Draw = unimplemented!();
draw.rect()
    .x_y(0.0, 0.0)
    .w_h(100.0, 100.0)
    .z_degrees(45.0)
    .color(PLUM);
}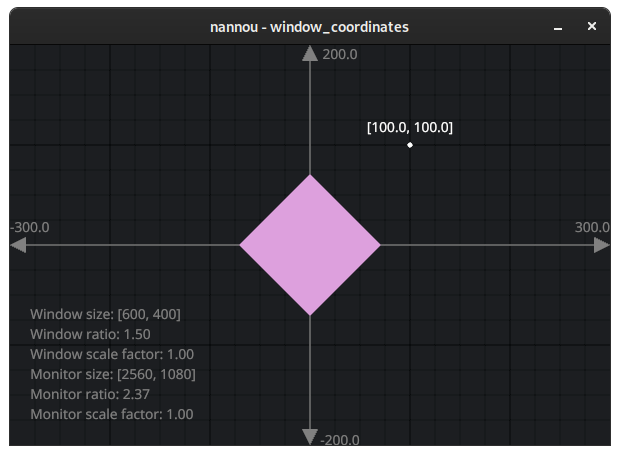
Voila!
Moving the square
OK, now let’s remove our rotation and try positioning the square so that the
bottom left corner touches the origin while the top right corner touches the
[100.0, 100.0] marker.
In order to do this, we want to move the square so that it is halfway between
the origin and the marker, so [50.0, 50.0].
#![allow(unreachable_code, unused_variables)]
use nannou::prelude::*;
fn main() {
    let draw: Draw = unimplemented!();
draw.rect()
    .x_y(50.0, 50.0)
    .w_h(100.0, 100.0)
    .color(PLUM);
}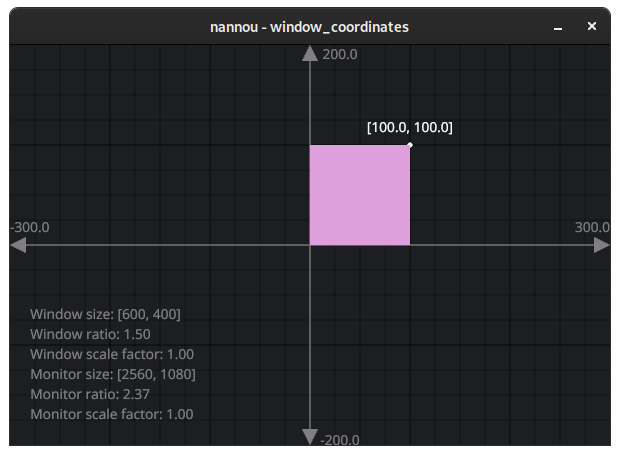
So satisfying!
OK, but what if we want to position our square in the top-left corner of the window?
One approach would be to calculate the position by hand. For example, we know the top-left corner is equal to [-300, 200]. From there, we need to move the square to the right by half the width and down by half the height:
#![allow(unreachable_code, unused_variables)]
use nannou::prelude::*;
fn main() {
    let draw: Draw = unimplemented!();
let side = 100.0;
let top_left = pt2(-300.0, 200.0);
let offset = vec2(side / 2.0, -side / 2.0);
let xy = top_left + offset;
draw.rect()
    .xy(xy)
    .w_h(side, side)
    .color(PLUM);
}
OK that worked! But it was a lot of effort. And what if the size of the window changes?
Enter, Rect.
Positioning with Rect
One of the most useful tools for working in window coordinates is the Rect
type. As the name suggests, Rect allows us to work with rectangles in a
variety of useful ways. We can align them, pad them, shift
them, stretch them, subdivide them, check if they contain a
point and more.
One of the most useful applications of Rect is for describing the bounds of
the window. Let’s retrieve the window Rect with the name win.
#![allow(unreachable_code, unused_variables)]
use nannou::prelude::*;
fn main() {
let app: App = unimplemented!();
let win = app.window_rect();
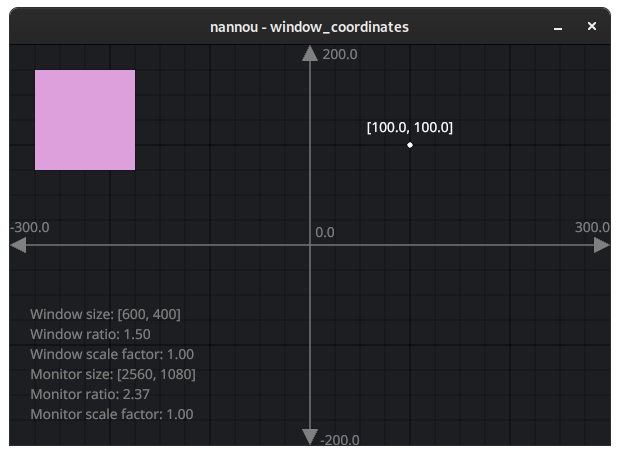
}Let’s use win to simplify aligning our plum square to the top left of the
window.
Alignment
First, let’s make a Rect that represents the position and size of our plum
square and call it r.
#![allow(unused_variables)]
use nannou::prelude::*;
fn main() {
let r = geom::Rect::from_w_h(100.0, 100.0);
}
r now represents our square, positioned at [0.0, 0.0] with a width and height
of 100.0. We can confirm this by changing our square drawing code to use r
like so:
#![allow(unreachable_code, unused_variables)]
use nannou::prelude::*;
fn main() {
    let draw: Draw = unimplemented!();
let r = geom::Rect::from_w_h(100.0f32, 100.0f32);
draw.rect()
    .xy(r.xy())
    .wh(r.wh())
    .color(PLUM);
}
We can align our plum square to the top_left_of the window like so:
#![allow(unreachable_code, unused_variables)]
use nannou::prelude::*;
fn main() {
    let draw: Draw = unimplemented!();
    let win: geom::Rect = unimplemented!();
let r = geom::Rect::from_w_h(100.0, 100.0).top_left_of(win);
draw.rect()
    .xy(r.xy())
    .wh(r.wh())
    .color(PLUM);
}
Much nicer!
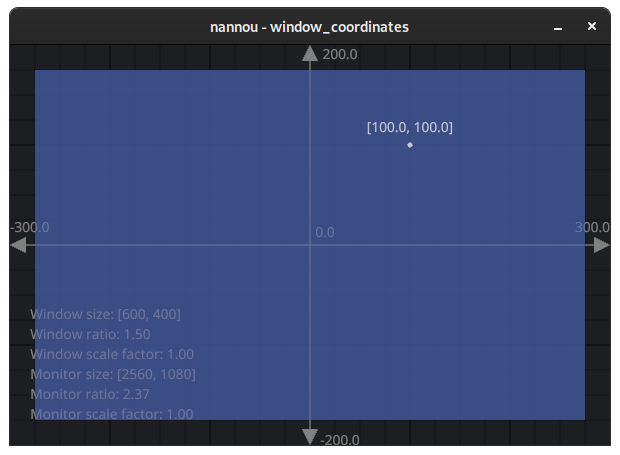
But what if we want some padding between the edges of the window and the square?
Let’s take a look!
Padding
We can use padding to add some space between the edges of an area and the
content within it. In nannou, we can use the pad method to produce a padded
instance of a Rect.
Let’s try padding the window rect by 25.0 and drawing it with a
semi-transparent blue color:
#![allow(unreachable_code, unused_variables)]
use nannou::prelude::*;
fn main() {
    let draw: Draw = unimplemented!();
    let win: geom::Rect = unimplemented!();
let win_p = win.pad(25.0);
draw.rect()
    .xy(win_p.xy())
    .wh(win_p.wh())
    .color(Color::srgba(0.3, 0.4, 0.7, 0.5));
}
As you may have guessed, we can use this new padded Rect to align our plum
square and achieve the desired look:
#![allow(unreachable_code, unused_variables)]
use nannou::prelude::*;
fn main() {
    let draw: Draw = unimplemented!();
    let win: geom::Rect = unimplemented!();
let win_p = win.pad(25.0);
let r = geom::Rect::from_w_h(100.0, 100.0).top_left_of(win_p);
draw.rect()
    .xy(r.xy())
    .wh(r.wh())
    .color(PLUM);
}
Relative Positions
Now that we have our plum square situated with some nice padding in the top left corner, let’s try drawing a salmon colored circle with the same size right below it.
Our handy Rect type provides methods for positioning below, above,
left_of and right_of another Rect. Let’s use the below method on a copy
of the square’s Rect so that we can use the resulting Rect to draw our
circle:
#![allow(unreachable_code, unused_variables)]
use nannou::prelude::*;
fn main() {
    let draw: Draw = unimplemented!();
    let win: geom::Rect = unimplemented!();
let win_p = win.pad(25.0);
let square = geom::Rect::from_w_h(100.0, 100.0).top_left_of(win_p);
draw.rect()
    .xy(square.xy())
    .wh(square.wh())
    .color(PLUM);

let circle = square.below(square);
draw.ellipse()
    .xy(circle.xy())
    .wh(circle.wh())
    .color(SALMON);
}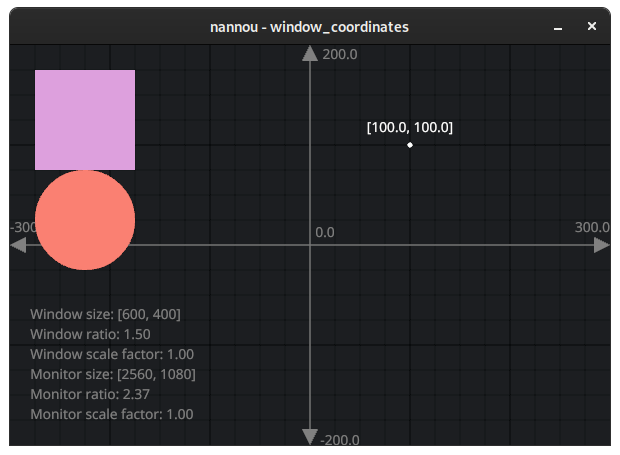
For consistency, let’s try and add the same padding between the circle and the square as we have between the square and the edges of the window.
We can do so by using the shift method to “shift” the circle down from the
square:
#![allow(unreachable_code, unused_variables)]
use nannou::prelude::*;
fn main() {
    let draw: Draw = unimplemented!();
    let win: geom::Rect = unimplemented!();
let pad = 25.0;
let win_p = win.pad(pad);
let square = geom::Rect::from_w_h(100.0, 100.0).top_left_of(win_p);
draw.rect()
    .xy(square.xy())
    .wh(square.wh())
    .color(PLUM);

let circle = square.below(square).shift_y(-pad);
draw.ellipse()
    .xy(circle.xy())
    .wh(circle.wh())
    .color(SALMON);
}
Gee wizz, I love salmon!
There are many more fancy tricks we can do with Rect to assist as a guide for
laying out our sketches. I’m already getting carried away, so I’ll leave it as
an exercise to the reader to check out the Rect docs and explore!
Before we bring this tutorial to a close, let’s take a quick look at what we really mean by all these numbers.
Points and Pixels
What exactly does 600x400 measure? Millimetres? Pixels? Something else?
In nannou, we generally describe positions within window space in points. Points are very similar to pixels, except that points allow us to work without having to worry about the “scale factor” of our display.
Wait, what is “scale factor”?
The scale factor helps us to reason about the density of pixels on the display. Modern displays don’t have a consistent relationship between resolution and size. For example, modern mobile phones can boast resolutions of up to 1440p, which is greater than the average 1080p desktop monitor, despite the screen being a fraction of the size!
For this reason, most devices expose a scale factor. This value describes the recommended UI scaling that should be applied in order to allow for a consistent user experience across devices. In nannou, we refer to this scaled space as points (aka logical pixels) and the physical pixel space as pixels. By working in points we can let nannou take care of scaling for us.
You can learn more about how window scaling works in nannou’s windowing library here.
To convert from points to pixels we can multiply by the scale factor:
#![allow(unreachable_code, unused_variables)]
use nannou::prelude::*;
fn main() {
    let points = 100.0;
    let window: Window = unimplemented!();
let pixels = points * window.scale_factor();
}
Similarly, we can convert pixels to points by dividing by the scale factor:
#![allow(unreachable_code, unused_variables)]
use nannou::prelude::*;
fn main() {
    let pixels = 100.0;
    let window: Window = unimplemented!();
let points = pixels / window.scale_factor();
}
Conclusion
Thanks for reading! Hopefully this has helped to demystify window coordinates in nannou at least a little.
Remember, the more you experiment and play, the more these things become second nature. Next thing you know you will start seeing everything in window coordinates!