Drawing Images
Tutorial Info
- Author: Josiah Savary
- Required Knowledge:
- Reading Time: 20 minutes
In this tutorial, we explore drawing images with nannou. We will cover loading textures from images in the app’s assets directory, drawing them, and applying basic transformations. You can also find this file, and other useful examples, in the examples directory of the nannou source repository.
What is a Texture?
Given the introductory nature of the tutorial, I’d like to briefly answer this question. To quote the Learn Wgpu website:
Textures are images overlayed over a triangle mesh to make the mesh seem more detailed.
In short, this is how the GPU on your machine understands how to draw images. The Textures and bind groups is definitely worth a read for those who want to learn more.
Getting Started
To begin, we will need to bootstrap an assets directory with some images at the root of our project. I recommend copying the assets directory from the nannou repo itself to get started. This can be accomplished from the command line like so:
git clone https://github.com/nannou-org/nannou.git
cp -r nannou/assets ./assets
rm -rf nannou
Once you have a fleshed-out assets directory at the root of your project, you’ll be ready to return to your main.rs file for the following steps.
Creating a Window
We need somewhere to display the image, so first, let’s create a window:
#![allow(unreachable_code, unused_variables, dead_code)]
use nannou::prelude::*;

struct Model {}

fn main() {
  nannou::app(model).run();
}

fn model(app: &App) -> Model {
  // Create a new window!
  app.new_window().size(512, 512).view(view).build();
  Model {}
}

fn view(_app: &App, _model: &Model) {
}
If you cargo run your app, you’ll see an empty window.
Setting up a Texture
Now, at the top of your main.rs file, add an image Handle<Image> field named texture to the Model struct. A Handle is a lightweight reference to an asset (in this case an image/texture) managed by Bevy’s asset system.
#![allow(unreachable_code, unused_variables, dead_code)]
use nannou::prelude::*;
struct Model {
  texture: Handle<Image>,
}
fn main() {
  nannou::app(model).run();
}
fn model(app: &App) -> Model {
  // Create a new window!
  app.new_window().size(512, 512).view(view).build();
  let texture: Handle<Image> = unimplemented!();
  Model { texture }
}
fn view(_app: &App, _model: &Model) {
}
Next, we’ll need to load an image to initialize the struct with. We can accomplish this by asking Bevy’s asset server to load an image file after we create the window in our model function, via the app’s asset_server() method. The asset server looks for files within the project’s assets directory, so we only need to spell out the image path from the root of that directory. Loading happens in the background, and the returned Handle can be drawn as soon as the asset is ready.
PNG and JPEG images are supported by default; further formats (e.g. hdr,
exr, gif, webp, tiff) can be enabled via the cargo feature of the same
name on the nannou crate.
#![allow(unreachable_code, unused_variables, dead_code)]
use nannou::prelude::*;
struct Model {
  texture: Handle<Image>,
}
fn main() {
  nannou::app(model).run();
}
fn model(app: &App) -> Model {
  // Create a new window!
  app.new_window().size(512, 512).view(view).build();
  // Load the image from disk and upload it to a GPU texture
  let texture = app.asset_server().load("images/nature/nature_1.jpg");
  Model { texture }
}
fn view(_app: &App, _model: &Model) {
}
After all that, we’ve still got an empty window…but not for much longer!
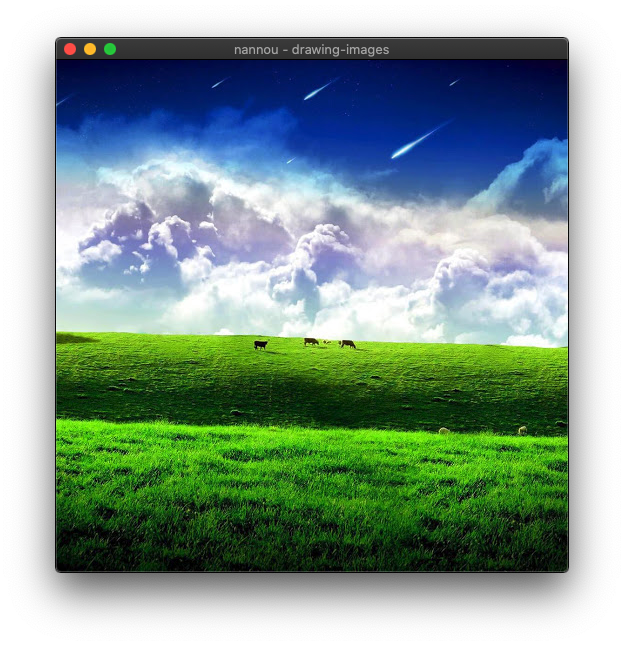
Drawing a Texture
Finally, in our view function, we can draw the texture stored in our model with the texture method of the App’s Draw API.
#![allow(unreachable_code, unused_variables, dead_code)]
use nannou::prelude::*;
struct Model {
  texture: Handle<Image>,
}
fn main() {
  nannou::app(model).run();
}
fn model(app: &App) -> Model {
  // Create a new window!
  app.new_window().size(512, 512).view(view).build();
  // Load the image from disk and upload it to a GPU texture.
  let texture = app.asset_server().load("images/nature/nature_1.jpg");
  Model { texture }
}
fn view(app: &App, model: &Model) {
  let draw = app.draw();
  draw.background().color(BLACK);

  draw
    .rect()
    .texture(&model.texture);
}
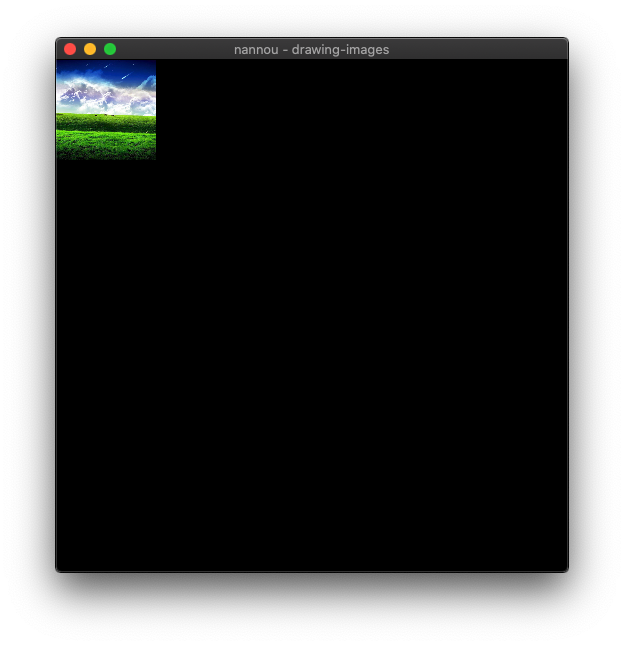
Translating and Scaling the Texture
A texture can be drawn at any location and any size desired within the frame. Let’s say we wanted to draw this image in a 100x100 square at the top-left corner of the window. Our view function might look similar to the following.
#![allow(unreachable_code, unused_variables, dead_code)]
use nannou::prelude::*;
struct Model {
  texture: Handle<Image>,
}
fn main() {
  nannou::app(model).run();
}
fn model(app: &App) -> Model {
  // Create a new window!
  app.new_window().size(512, 512).view(view).build();
  // Load the image from disk and upload it to a GPU texture.
  let texture = app.asset_server().load("images/nature/nature_1.jpg");
  Model { texture }
}
fn view(app: &App, model: &Model) {
  let draw = app.draw();
  draw.background().color(BLACK);

  let win = app.window_rect();
  let r = geom::Rect::from_w_h(100.0, 100.0).top_left_of(win);

  draw
    .rect()
    .texture(&model.texture)
    .xy(r.xy())
    .wh(r.wh());
}